How to Draw With Circles
If yous tin can make a bird out of circles, then you lot tin can probably make all sorts of animals. I wanted to add something more design-based to my portfolio, then I fabricated that my personal challenge. The idea was to depict animals from exactly thirteen circles, and I decided to match that number by making 13 animals. This makes for a nicer title for the project, and it helps to go others to share it around the web, too. Knowing what you want to create early helps, because then all you have to do is figure out ways to go far happen.
The drawing challenge more often than not consisted of three Adobe applications: Photoshop, Illustrator and After Effects.
Further Reading on SmashingMag:
- Beautiful Photoshop Illustrations By Artists Around The Earth
- Drawing A Cartoon In Illustrator
- Create a Cute Little Tiger in Illustrator
- How To Create A Water Lily In Illustrator
Getting Started: Sketching
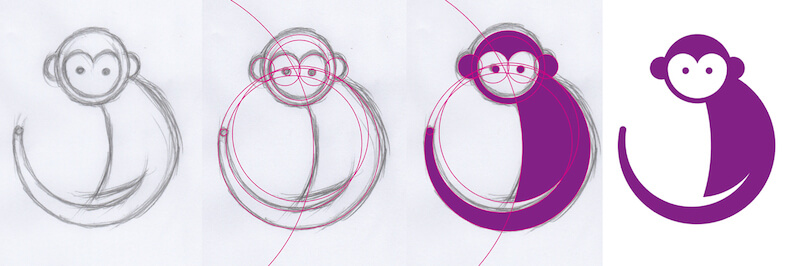
I adopt to sketch things on paper commencement, but y'all can practise and then digitally too. First, I chose some animals that I didn't think would be extremely difficult to draw. And then, I chose prominent features of those animals to focus on. I as well Googled logos, designs and illustrations of the animals to see what features other people emphasize. When express to 13 circles, you can't fit everything! For example, with the monkey, all I could fit were the ears, the long tail and the outline around the eyes, leaving me with few circles to play with, but that's OK.
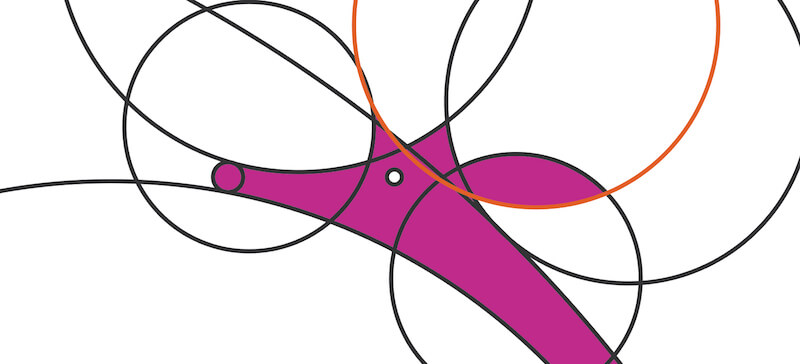
While sketching, I kept rail of the number of circles I was using, counting one for every curve. If I had too many circles, I would examine them to encounter if ii curves could somehow come from ane circumvolve. For example, in the part of the giraffe beneath, the orangish circle serves every bit both the pinnacle of the left horn and the bottom of the ear:
More than afterwards jump! Continue reading below ↓
Illustrator
After I had a sketch I was happy with, I photographed it or scanned it to my computer.
Earlier I began, I decided on a size for the project. This is of import for consistency and to keep things moving apace in Photoshop and After Effects. I chose viii × 10 inches at 300 DPI (or PPI), merely in example I decided to print them after, because that's a common impress size. I as well felt the ratio would be expert to turn them into animated GIFs later.
Here are the first steps to take in Illustrator:
- Open your sketch, or elevate or paste it into your sized document. Select the sketch, and click
Ctrl + 2to lock information technology in place. - Describe circles using the Ellipse tool (
L); to make perfect circles, holdShiftwhile dragging. Yous tin can find the ellipses by property or right-clicking the Rectangle tool. Select your circle(s), and gear up the fill up to none, and cull a pocket-size stroke to work with. Hibernate the sketch layer one time you've finished past clicking the middle. - Select all of your circles by enabling the Selection tool (
Five) and dragging from one corner over the entire screen. Resize them to the size yous want the brute to be in the document. This is important if you want to save time later. - With the circles still selected, we're going to make a backup by clicking
Ctrl + C, so clicking "New Layer," then clickingCtrl + F. This pastes in the exact aforementioned location. Hide the backup layer. - Click the Shape Architect tool (
Shift + M), choose a fill color (removing the stroke), and click in the parts of the circles that yous want to fill in. - Once y'all're happy with the shape, isolate all the filled shapes from the circles past clicking on one and then going to menu "Select" → "Same" → "Fill Color". One time they're selected, you tin can simply copy them, select & delete everything in the document (we backed upwardly the circles), and press
Ctrl + Fto bring dorsum merely the filled shapes.
Instead of the Shape Builder tool in step 4, you could besides use the Live Pigment Bucket tool (Yard), which allows you to motion the circles safely while keeping your area filled in, so you would aggrandize at the very end.
Sometimes the curves I sketched didn't perfectly form a circle, so I'd accept to go back and move a few curves effectually or change their sizes. If you simply want to suggest some shapes in your animal (rather than being explicit), you may take to add more circles. For case, sometimes I would want an area to be cut out, such as the inside of the fox tail. Other times, I would want an area to be a dissimilar color from the rest of the shape, such as the toucan's beak. There are many ways to create separation.
At this point, I had the fauna (still in pieces), a subconscious layer with the circles, and a subconscious layer with the sketch.
Sometimes, at this point, I would plow the animal into one solid shape. To do this, select the animal, open the Pathfinder panel (in the menu, "Window" → Pathfinder, or Ctrl/Cmd + Shift + F9) and click the "Unite" option. The paths might have pocket-sized flaws, but you tin can usually fix those using the Straight Option tool (A), which allows you to click private anchors and paths to easily motion, modify or delete them.
Often, however, rather than turning an animal into a solid shape, I would add a bit of shading using gradients. I would often add these to one section of the animal, and I would use the same method as higher up to select a couple of pieces of an beast and merge those pieces into one (often, my animals would be in two or three pieces by the end).
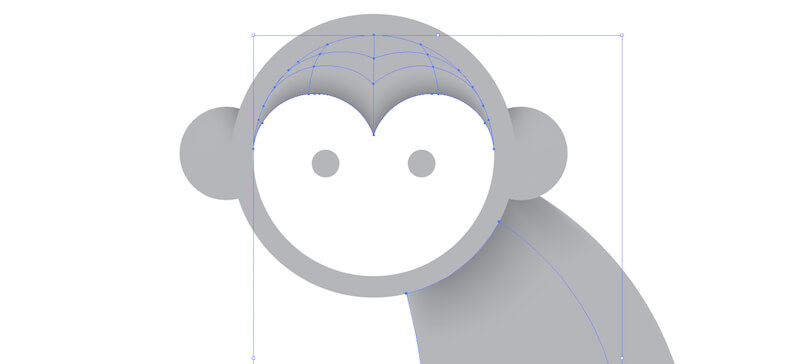
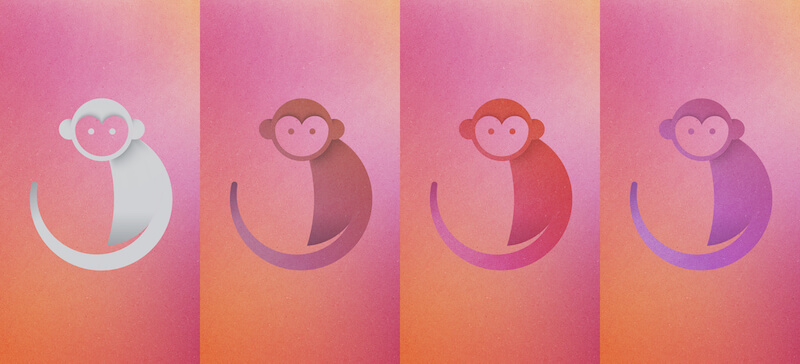
In this instance, you can see that I used different shading methods on different parts of the monkey. In a higher place the monkey's eyes, I used the Mesh tool (U) to get a slope that follows the curves. A fast style to add a mesh is to click an object and become to "Object" → "Create Gradient Mesh." I'm not an expert with this tool yet, so my attempt is more of an experiment.
Underneath the monkey's face, I simply used a regular slope. A fast way to apply a slope to an object is to click the object and press the period cardinal (.). Then, in the menu, go to "Window" → "Gradient" to open the Gradient panel and change the settings of that gradient.
Because I knew I would be bringing the animals into Photoshop later on, I simply shaded them with shades of gray. This fashion, if I wanted to employ different blending modes with colors and textures, the hues that I chose would be retained.
Photoshop
Create a document in Photoshop of the exact size equally your Illustrator document (this is to make things piece of cake and is not a requirement). I also stayed with the RGB color space because my focus is the web, merely I can always convert to CMYK after if I want to print. Earlier bringing in the animals, I would create the background start.
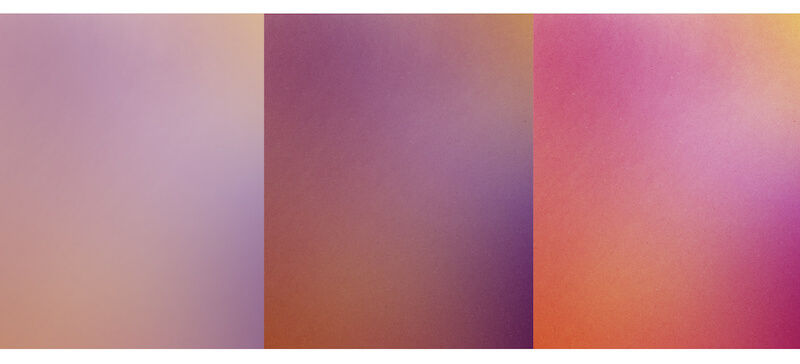
I started with the colors. At that place are many means to create gradients. I started with a white groundwork and and then but stacked a few transparent layers of lightly brushed colors. Sometimes I would farther tweak the colors using an Aligning Layer such as "Curves" (experiment to find what works best for yous).
Once you've got the color gradients downwards, it's time to add some texture! I experimented with many different textures that I downloaded online — you can find many by searching for terms similar "free newspaper texture." There are also some nice textures on Subtle Patterns, merely they're commonly small image tiles meant to be repeated, and I personally don't like repeating ones.
I frequently used a subtle paper texture as a base and then used other textures to bring out more calorie-free and night speckles. It's easy to bring out speckles from a texture using Curves or Levels. All of my textures are overlaid using different blending modes, too as past experimenting with opacity.
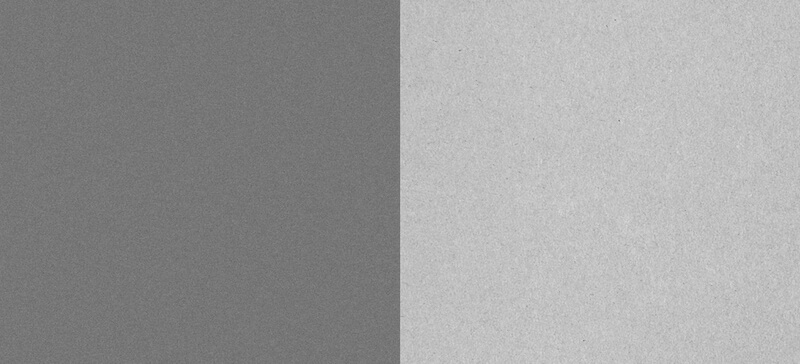
Below are the noise layer and the texture image that I used for the background above:
And beneath are the layers for the background, forth with my settings for each Curves layer. The really crazy curves were the ones I used to bring out different parts of the textures, such as the speckles.
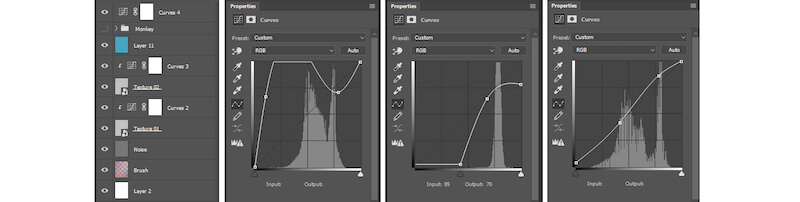
As I said, experiment with Photoshop'south functionality until you're happy. Hither are the layers for this background, starting from the bottom:
- a bare white groundwork;
- lightly painted colors at a small opacity using the brush;
- racket ("Filter" → "Dissonance" → "Add Noise") at a 41% "Overlay" blending style, sometimes enlarged or blurred;
- a texture layer with "Colour Burn down";
- a Curves adjustment layer clipped to the texture layer, to create a high contrast for the speckles in the texture;
- a texture layer again, rotated to a different position and a "Color Fire" of 40%;
- a Curves layer clipped to the texture, this time bringing out the textures in a dissimilar fashion;
- a blue layer set to "Separate" at 37%;
- an overall Curves layer to brighten the unabridged paradigm (including the monkey).
Once my background was gear up, I brought in the fauna as a smart object. Utilize smart objects whenever possible. I but copied and pasted the brute from Illustrator. Considering the documents are the same size, the animal should be pasted into Photoshop at the same size. I didn't resize the fauna in Photoshop, so that I could hands marshal the circles in a further step.
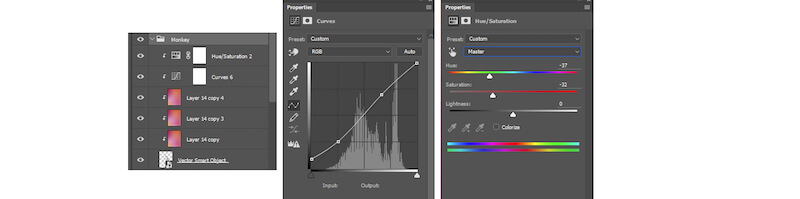
Here are the layers I used for the monkey:
- a monkey smart object;
- a stamp of merely the groundwork (
Ctrl + Alt + Shift + E), clipped to the monkey, at "Multiply"; - another stamp of groundwork, clipped to monkey, with a "Hard Low-cal" of 34%;
- another stamp of background, clipped to the monkey, with "Multiply" set to 34%;
- a Curves layer, clipped to the monkey, to brighten it up;
- a "Hue/Saturation" layer, clipped to the monkey, to make the hue a more blueish-majestic.
Hither are a few points in the evolution of the monkey:
Illustrator Again
Information technology'south almost time to animate! I animated in After Effects, although many programs will exercise it (Photoshop has some basic blitheness capability, too).
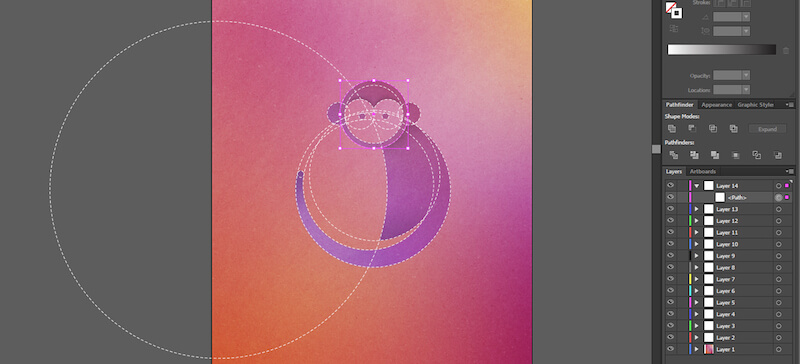
Use "File" → "Identify" (Shift + Ctrl + P) to place the Photoshop file in Illustrator as a linked object; this way, if you need to make any changes in the Photoshop file, it will automatically update in Illustrator. Placing the file in the elevation-left corner anchor works best, from what I've seen. Adjacent, bring dorsum your circles by unhiding the backup layer we created. You may have to elevate and change the order of the layers to stack the circles on top, and you lot might accept to realign them to your creature if it has moved.
I decided to stoke the circles with a dashed line. I did this by selecting the circles, clicking "Stroke," checking "Dashed line" and specifying the size of the dash and the size of the gap. I used 5 points for the dash and 3 points for the gap.
In example y'all need to slightly resize the circles, select them and use the width ("W") and top ("H") boxes on top to alter the size in small increments. Make certain the concatenation in the middle is activated, to maintain the proportions.
I had to put each circumvolve on a separate layer so that I could animate them in After Effects. I simply created 13 new layers, then dragged a circle into each i. Your file volition expect like this:
After Effects
First, download and install Ease & Wizz, which volition make the move of our circles a bit more than interesting — moving in tedious, speeding up quickly, and ending dull again. This is a "name your toll" script, and so you lot could technically download it for $0.
Start a new projection, go to "Import" → "File" (Ctrl + I), and select your Illustrator file. Simply make sure where information technology says "Import as Footage," yous change information technology to "Composition — Retain layer sizes."
If the composition doesn't open up up right abroad, double-click it in the "Projection" tab. If y'all're planning to resize the limerick, make sure to click the fiddling gear icon to the right of it.
It might also be a good thought to choose an animation frame charge per unit before starting ("Limerick" → "Limerick Settings"). I chose twenty frames per 2d because I knew my animation would be quite curt and would loop. If yous're working with a longer animation, you should lower it, because animated GIFs with a loftier number of frames can finish upwardly being also big in size.
Select all of the layers except for the layer with the background; right-click and choose "Create shapes from vector layer." These are the shapes nosotros'll be animating. The original Illustrator layers should however exist there, but their visibility should now be off.
Choose a shape layer, and click its contents; to the right of it, where information technology says "Add," select "Trim Paths." Showtime, I fix "End" to 0%. Clicking the stopwatch near "Commencement" or "End" will activate the keyframes for that activity and turn blue. A keyframe volition exist created at that point, depending on where your indicator is placed. It'll be a small diamond. I set mine to "First 0%," which fabricated my circumvolve invisible, and I moved information technology downward the timeline to where I wanted my circles to start animative. Motility your indicator downwards the timeline, and and so change "Start" to 100%; yous'll meet a new keyframe announced automatically.
Depending on which management you want the path to disappear (clockwise versus counterclockwise), you might have to get-go with "Starting time" or "Finish." Below is an example of what I did to brand the circle be invisible at first for a moment, appear into the frame, pause, and then disappear in the direction that it appeared. The timing isn't what I used for my project — it's just an case.
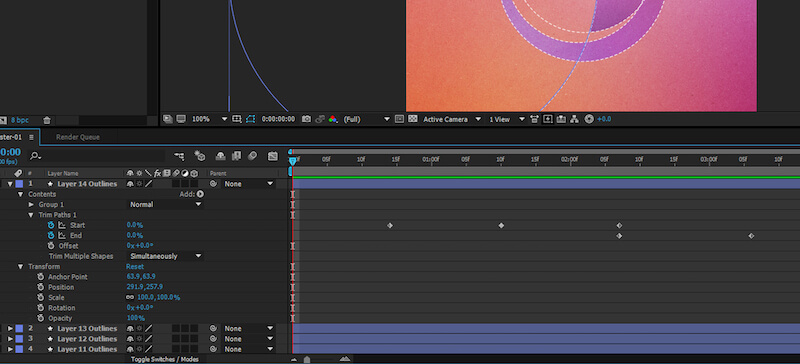
Here is the breakup of my keyframes:
- Starting time 0%
- Kickoff 100%
- Get-go 100% and End 0%
- End 100%
And so, I added the Ease & Wizz effect. Open the plugin past going to "Window" → "Ease and Wizz" (.jsx). And then, highlight and select all of the keyframes, and click "Apply" (I used the plugin's default settings). The percentage text should at present be in ruby. Yous could besides drag the plugin window into your toolbar, so that information technology'due south not floating around.
Also, I used the Rotation tool (W) on the circles to rotate them, then that the animation starts at a different point, such as the stop of the tail, rather than right in the middle of it.
You can also copy and paste your keyframes into the "Trim Paths" folder of another circle if that animation is going in the same management that you want this circle to go in. I created a clockwise animation and then a counterclockwise one (renaming the layer folders to not lose my place), and I would copy and paste those keyframes into the rest of the circles according to how I wanted; for instance, the monkey'south tail would be counterclockwise, whereas the ears would be clockwise.
Once all of the circles are washed, you can go to "File" → "Export" → "Add to Render Queue" (or Ctrl + Shift + /) and render information technology every bit an AVI file (or any video format of your choice).
Turning the video into an blithe GIF
Dorsum To Photoshop
To turn the video into an animated GIF, I opened Photoshop and went to "File" → "Import" → "Video Frames to Layers." One time it opens upward, I went to "Windows" → "Timeline" (or "Animation") to open the "Animation" tab. In newer versions of Photoshop, yous have the option of a video timeline or a frame animation. I chose frame animation.
Because there were pauses in my animation, each break rendered as its own frame, so I had to delete all of the duplicate frames from each pause in the animation and proceed only one frame, simply and then set the timing of that i frame to a higher duration. You can avoid this by removing all gaps in your Later Effects blitheness and then adding the pauses dorsum in Photoshop; all the same, not being able to come across the entire thing at once might make information technology a petty harder to decide on the duration of the animation. Also, don't forget to ready the looping option to "forever."

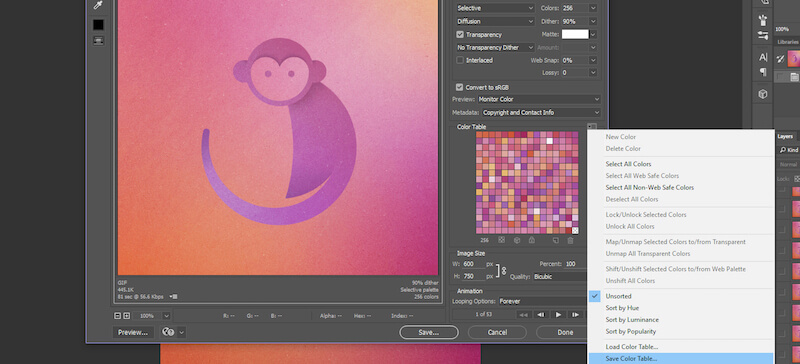
Once that'southward done, become to "File" → "Export" → "Salvage for Web" and choose "GIF." Here is where it gets experimental, because I had to play around with the settings to become a good balance of quality and file size. Choosing the best quality will often make the file size way too big (I try never to exceed 1 MB for a GIF).
I also found that when resizing the image to be smaller, the color table would alter and would often look much worse (or fifty-fifty vice versa). Here's a trick: Change the animated GIF to various sizes until the colors wait as best as possible, and so save that color table, resize it to your desired size, and and then load that color table:
All washed!
Some Reflections
- When I initially created the animals, I didn't make sure that all of my document sizes were the same, and so I had to resize and realign all of the circles for each animal! Pay shut attending to document size.
- I haven't figured out why an epitome loads in After Effects at narrower than 600 pixels, even when the original certificate is much larger! I have a lot to learn about After Furnishings.
- I haven't however figured out a way to quickly remove extra frames in a Photoshop blitheness. Maybe ameliorate applications for creating GIFs are out there?
I also gained some knowledge while working on this:
- I've never actually drawn so many animals before. I realized with this project that you're not really drawing the animate being — y'all're mainly just drawing its features! That takes a lot of the pressure off.
- I also realized that experimenting with textures tin can be extremely difficult and sometimes hit or miss. Commencement edifice your texture collection folder early on! I wish I had started years ago.
- I discovered the color table trick just after getting extremely annoyed when some of the GIFs would of a sudden look horrible when I'd change their size by a slight corporeality (for example, l pixels in width). Always be open to discovering tricks, even in the applications nigh familiar to you!
- This was probably my 3rd time making something in After Effects, so at that place was a lot of tedious trial and fault hither, as well as some help from a friend. It helps having friends who share your passion.
I did many things that could probably have been washed more rapidly or easily. This was a learning experience. If you have any tips for making these types of animations faster, better or easier, feel costless to share in the comments!
Hope you enjoyed the animations!
Total Preview Of All 13 Illustrated Animals

![]() (vf, il, al)
(vf, il, al)
Source: https://www.smashingmagazine.com/2017/01/illustrating-animals-13-circles-drawing-tutorial-challenge/
0 Response to "How to Draw With Circles"
Post a Comment